Having actually finished (!!!) the Serenity Stroller Snuggie, complete with a nice, smooth-yet-bouncy cast off and all the evil little ends woven in, I had to block it. Since both types of yarn were labeled "washable", I wasn't too worried about getting it wet. And my mother, for no apparent reason, decided to give up the interlocking foam pads we got her to use as a "gym" floor - so suddenly I have interlocking pads that I can stick pins in (through a towel).

Note: stroller snuggie started smaller than blocking board, edging included.
But what's the best way to block a small, wool blanket made from hand-dyed (yet possibly not quite colorfast) fibers?
I found To Block or Not to Block, Jessica Fenlon Thomas's great blocking article from the last Knitty of 2002 (and there's also Marilyn Robert's Swatch Out! from the first Knitty of 2003). Cirilia & Norah of the Berocco Blog answered some blocking questions just a few weeks ago. Plus, I have several books and articles about the process, and I have learned a bit about it from the TKGA Basics course. So, based on all this advice, here's what I did:
1. Read the label. Frequently, I lose yarn labels - but I've taken extraspecial care to keep track of these, since I'm giving the blanket away as a gift. (This is rare for me. I don't Knit For Others hardly at all, so I had to remind myself, over and over, to NOT lose track of the labels, and NOT lose track of the extra yarn...) Care instructions can give a good hint to what to do. Here, the Dulce requires gentle hand washing in cold water, and the Mini Mochi requires the same. (I'm going to give the new owner the leftovers of the yarn, too, in case repairs are ever needed, but as you can see, there's not much left.)

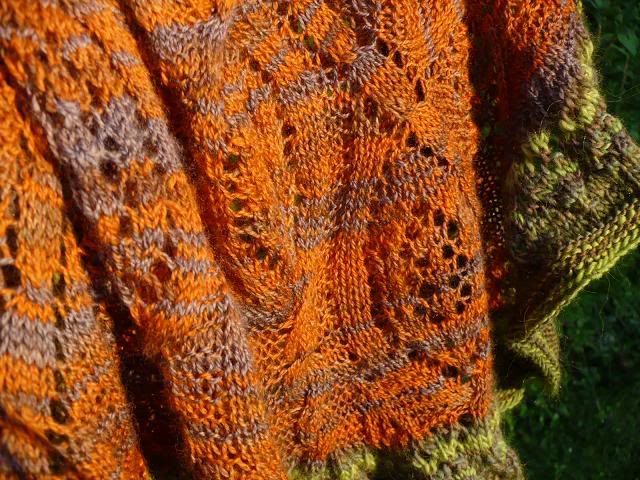
2. Determine type of blocking necessary depending on fiber and pattern. Things are a bit different for, say, lace versus cables. Naturally, I decided to make something with both, just to drive myself nuts. For cables, you want to not block, or if you must, cold water block only, so the cables don't get stretched out and flattened. For lace, on the other hand, you want to really stretch things out, to open up all the yarn-over holes and expose the pretty pattern. Lace always, always needs blocking. (Unless you knit really loosely - I didn't have to block my Secret of the Stole II, and it looks fantastic.) Cables interspersed with lace? I figured cold water blocking would work, if I was careful about how I pinned it.
3. Get tools together. I now have stainless steel pins (since my regular pins did, as promised, rust!), and interlocking floor mats, since this is bigger than my little clear-trashbag-covered-flattened-box will allow.

4. Get the sucker wet. Because of the care instructions, I reasoned a brief, unagitated total immersion, followed by being rolled, not wrung, dry in a big fluffy Martha Stewart white towel would be the way to go. Thankfully, I found (and washed, and super-fluff-dried) the towel last week, so it was washed and ready to go. Because of the cables, all this was done in cold water, and the floofly edges were kept mostly dry, since if the lace in the edge doesn't show up all that much, that's perfectly fine.


5. Start pinning. This blanket is supposed to end up being a square shape, but it's got a ruffly edge that, while not exactly the original plan, looks really, really pretty. With that in mind, I and my Helper Elf (aka my incredibly patient husband, who realized I was going to drive myself into a tizzy if this wasn't Exactly Perfect) figured out about how big I wanted the blanket to be in the end, versus what was its actual probable finished size, and figured out where the four corners on the board would be, and which parts needed more stretching than others. This lace-and-cables thing? YIKES..

Then it was a giant game of "add pins at appropriate points" until we ran out of pins.


... it's full of stars..!
6. Measure everything to make certain it's straight. And remeasure. And check with a right angle, unless it's a curly bit. And obsess about it. And worry. And finally get taken out to dinner because Helper Elf has about had it with the dratted blanket.

Center of snuggie now size of blocking board, so edges must dangle down to floof and dry.
7. Let dry for the appropriate amount of time. Having little or no idea how long this would be, a space on the floor was cleared so the house's central fan would speed the process. Lace, especially, shouldn't get touched until it's bone dry. Actual drying time: approximately 30 hours. (It may have been shorter; there was some sleep in there.)

8. Unpin. I took the pins out in more or less the opposite of the order I put them in, because it's headed for a baby's stroller - and I'd vastly prefer said baby to remain unpinned.
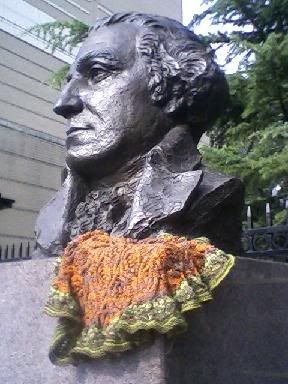
9. Examine carefully. Decide that it's quite pretty, and even though you're giving the blanket to a really good knitter, she'll understand that you tend to wing it a bit on patterns, and will appreciate that hey, YOU ACTUALLY FINISHED SOMETHING. And just in time for the baby, who made her way into the world last week, although she certainly won't need a warm, woolly stroller snuggie until October or so... she'll now be guaranteed to have one when she needs it.
9 (a), optional. Post arty shot of finished product on line for everyone to admire.
10. Decide that it's gonna be a while before you try anything like this again.... and then remember that you've got at least five things "like this" already started.
Repeat as necessary.

It's beautiful! I'm in awe!
ReplyDeleteThat looks fantastic! My hat's off to you and hubby for the pinning event of the night.
ReplyDelete